This is a rundown of each of the tools and what they are used for. The tool bar can be found (usually) down the left hand side of the screen.
Many of the tools have a small black arrow on the bottom left hand corner of the button – right clicking on these buttons gives more options for the tool.
This is the move tool (shortcut V). The name says it all – this is used to move your images.
When you have finished typing using the type tool, you can click this move tool to continue working.
This is the rectangular marquee tool, which is used to make a selection. If you want to make your selection square, hold in shift – this keeps the proportions.
By right clicking on the rectangular marquee tool, you have the options of;
- · elliptical marquee tool (this creates a circular selection – holding shift will also keep these proportions)
- · single row marquee tool (this selects a small horizontal line)
- · single column marquee tool (this selects a small vertical line)
If you want to deselect any area created by a marquee tool, go to select>deselect (or use shortcut ctrl + D)
This is the lasso tool, which is a freehand way of selecting an area. To use this, click and hold the mouse while surrounding the area you wish to select. When you have your desired area, simply let go of the left-click.
By right clicking on lasso tool, you have the options of;
- · Polygonal Lasso Tool (this creates polygon selections. To use this click and release on a point of your desired area. Then move to another section, and once again click and release – this will create a straight line between the two points. Continue until you have selected your whole area, and finish on your starting point)
- · Magnetic Lasso tool (this tool clings to edges in the image. Place your first point on an edge, and simply drag your mouse around the line of the image. This tool will automatically select points, but you can also click and place your own points. If one of the points is incorrect, simply hit delete or backspace.
This is the Magic wand tool, yet another way to make a selection. This tool selects areas of the same tone/colour. To use this, simply click on part of the area. If you do not want this selection, press ctrl + D.
By right clicking on magic wand tool, you have the option of;
- · Quick selection tool (this will select areas you roll your mouse over. To use this, click and drag. Once again, it you do not want this selection press ctrl + D.
This is the crop tool, which is used to crop (cut a picture down to just the piece you want). To use this tool, click and drag over the image to make your selection. A grid with dotted lines will appear over your selection – this can be resized if needed. Once you have the desired area, hit enter. This will crop your image.
By right clicking on crop tool, you have the options of;
- · Slice tool (this lets you create hot spots/select particular pieces of an image on a grid. This is typically used in web design)
- · Slice select tool (this lets you make modifications to the slices you created using the slice tool
This is the Eye dropper tool, which is used to select a colour from your image. To use this, simply click on the colour you wish to use.
By right clicking on eye dropper tool, you have the options of;
- · Colour sampler tool (this is used in the same way as the eye dropper tool. However, this tool generates the RGB numbers for each colour. Up to 4 samples can be taken at one time using this tool.)
- · Ruler tool (this is used to measure the length of a line. To use this, click at one end of your line, and then at the point you wish to measure to – the measurements of your line can be found along the top tool bar)
- · Note tool (this is used to make notes on your image. To use this, click the area you want to make a note on and type into the box. A note can be made visible/hidden by clicking on the note icon created)
- · Count tool (this is used to individually count objects within your image. To use this, click on each object you wish to be counted and Photoshop will automatically keep count of your clicks – these can be viewed along the top tool bar)
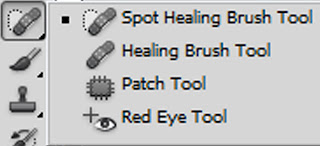
This is the Spot healing brush, which is used to correct blemishes. To use this, left click on the mouse and drag over the blemish. Photoshop will retouch this area to its closest proximity. NOTE: this works best on small areas.
By right clicking on spot healing brush tool, you have the options of;
- · Healing brush tool (this is used to correct blemishes too, with more control. This uses a pre-defined area to replace the blemish. To use this, first alt + click on the area you wish to replicate [it is best to use an area close to the blemish to achieve the best effect]. Then click the blemish and drag over the area until it is corrected.
- · Patch tool (this is used to ‘patch’ an area with something different. To use this, click and hold the mouse while dragging around the area you wish to patch. You can then insert a pattern using the tool bar at the top. To do this, select your pattern from the options, then click use pattern.
- · Red eye tool (this is used to remove red eyes from photographs. To use this, click the red eye. The pupil size and darken amount can be set along the top toolbar to suit your needs.
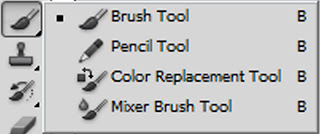
This is the brush tool, which is used to draw with. The thickness of the brush etc can be set along the top tool bar, and the colour down the bottom left. To draw a straight line with this tool, hold shift and click while dragging in the direction you want the line to go.
By right clicking on brush tool, you have the options of;
- · Pencil tool (this is used to draw thinner lines. This is used in the same way as the brush tool)
- · Colour replacement tool (this is used to replace the colour of areas. To use this, alt +left click on the area of colour you wish to use, then left click and paint the area you wish to cover)
- · Mixer brush tool (This allows you to blend colours on the image in a painterly way. To use this, first select your painting option on the top tool bar [for example, wet, light mix]. Then simply left click and paint over the photograph you are using)
This is the clone stamp tool, which is used to clone areas of your image. To use this you must first select the area you wish to clone from. To do this, alt + left click the area. Then you go to the area you wish to clone into, and left click to paint. You may need to redefine your points as you paint to achieve the best effect [simply alt + click on a different area])
By right clicking on clone stamp tool, you have the option of;
- · Pattern stamp tool (this is used to paint in sections of pattern. To do this, first select the pattern you wish to use from the top tool bar. Then simply left click and paint over the section you wish to cover)
This is the history brush tool, which is used to erase any marks to reveal the original image. To use this, hold down a left click and drag over the area you wish to erase.
By right clicking on history brush tool, you have the option of;
- · Art history brush tool (this works much the same as the history brush tool, but as well as erasing the mark, it applies a painterly style effect to the original image)
This is the eraser tool, which is used to erase areas of the image/object. To use this, left click and hold while dragging over the area you wish to erase.
By right clicking on eraser tool, you have the options of;
- · Background eraser tool (this is used in the same way as the eraser tool)
- · Magic eraser tool (this eraser tool erases areas that Photoshop picks up. It’s tolerance can be set along the top tool bar)
This is the paint bucket tool, which is used to paint areas/sections of your image/object. The colour can be set down at the bottom left of the side tool bar.
By right clicking on paint bucket tool, you have the option of;
- · Gradient tool (this is used to create a gradient. To use this, select your gradient from the top tool bar. Then left click where you want your gradient to start, followed by another left click where you want it to end. You can change the colour of any of the gradients by clicking on the coloured part of the gradient button on the top tool bar)
This is the blur tool, which is used to blur parts of your image. This is used the same as the paint brush tool – click and hold while dragging over the area you wish to blur. Size and hardness can be set on the top tool bar.
By right clicking on blur tool, you have the options of;
- · Sharpen tool (this is used to sharpen sections of your image. Click and hold while dragging over the area you wish to sharpen. Size and hardness can be set on the top tool bar)
- · Smudge tool (this is used to smudge sections of your image. Click and hold while dragging over the area you wish to smudge)
This is the Dodge tool, which is used to lighten the areas you ‘paint’. To use this, click and hold while dragging over the area you wish to lighten.
By right clicking on dodge tool, you have the options of;
- · Burn tool (this is used to darken areas of your image. To use, click and hold while dragging over the area you wish to darken.
- · Sponge tool (this is used to either saturate or desaturate a colour, which can be selected on the top tool bar. To use, click and hold while dragging over the area you wish to saturate/desaturate)
This is the pen tool, which is used to draw lines using points. To use, place your first point by left clicking. Then, move to another place, and create another point. The lines can be bent by holding one of the dots on the line and dragging into your desired position. Also, extra point can be created on one of your lines to create an extra bend.
By right clicking on pen tool, you have the options of;
- · Freedom pen tool (this allows you to draw a free-hand line. To use, click and hold while drawing your line)
- · Add anchor point tool (this tool allows you to add points to a line, which in turn can be used to change the shape of the line)
- · Delete anchor point tool (this tool removes anchor points you have previously created. To use, click the anchor point you wish to remove)
- · Convert point tool (this is used to change the shape of your line. To use, click an anchor point, hold and drag to your desired position)
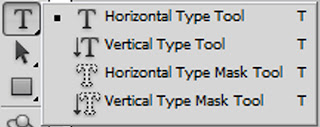
This is the horizontal type tool, which is used to add text. To use, click where you want the text to go, then type. When you have finished typing, click the move tool. Alternatively, if you want text to be confined to a certain space, after clicking the type tool, click and hold, and drag into the shape you want the text to fill – this will create a text box, and your type will automatically conform to this shape. Font and text size can be controlled at the top tool bar. You can also resize your text by using ctrl + T (if using this, don’t forget to hold shift to keep the proportions!)
By right clicking on type tool, you have the options of;
- · Vertical type tool (this is used to create vertical text, and is used in the same way as the horizontal type tool)
- · Horizontal type mask tool (this creates a horizontal type mask, which can then be used to ‘cut out’ your words from an image/object. NOTE: this will be covered in a tutorial)
- · Vertical type mask tool (this creates a vertical type mask, which can then be used to ‘cut out’ your words from an image/object. NOTE: this will be covered in a tutorial)
This is the path selection tool, which is used to select any path component. To use, select the path by clicking anywhere inside the path component you want.
By right clicking on path selection tool, you have the option of;
- · Direct selection tool (this is used for moving and reshaping segments in a path. To use, click an anchor point to select it, and drag to reshape/move)
This is the rectangle tool, which is used to create rectangular objects. To use, click and hold, while dragging into your desired rectangle shape. To create a square, hold shift while clicking and dragging – this will keep the proportions.
By right clicking on rectangle tool, you have the option of;
- · Rounded rectangle tool (this creates a rectangle with rounded corners, and is used in the same way as the rectangle tool)
- · Ellipse tool (this creates circular objects, and is used in the same way as the rectangle tool)
- · Polygon tool (this creates a polygonal shape. The number of sides can be set on the top tool bar. This is used in the same way as the rectangle tool)
- · Line tool (this creates a line. To use, left click where you want the line to start, and hold and drag to where you want the line to end. Holding shift will create a straight line)
- · Custom shape tool (this creates a shape, as selected on the top tool bar. More shapes can be seen by clicking the small arrow on the right hand side of the shape drop down box. This is used in the same way as the rectangle tool.)
This is the 3d object rotate tool, which rotates 3d objects. To use, hold down a left click and drag up or down, which rotates the object on its x-axis, or side to side, which rotates the object on its y-axis.
By right clicking on 3d object rotate tool, you have the options of;
- · 3d object roll tool (this is used to roll the model around its z-axis. To use, click and hold while dragging side to side)
- · 3d object pan tool (this moves the model. Click and drag side to side to move the model horizontally, or up and down to move vertically)
- · 3d object slide tool (this moves the model sideways and closer/further away. Click and drag side to side to move horizontally, or up and down to move closer/further away)
- · 3d object scale tool (this changes the scale of the model. Click and drag up and down to make the model larger or smaller.)
This is the camera rotate tool, which is used to change the view of the 3d camera. To use, click and drag to orbit the camera on its x or y axis.
By right clicking on 3d camera rotate tool, you have the options of;
- · 3d camera roll tool (click and drag to roll the camera)
- · 3d camera pan tool (click and drag to pan the camera horizontally or vertically)
- · 3d camera walk tool (click and drag to walk the camera)
- · 3d camera zoom tool (click and drag to change the field of view)
This is the hand tool, which is used to move objects etc. To use, click and hold while dragging to your desired position.
By right clicking on hand tool, you have the option of;
- · Rotate view tool (this is used to rotate the canvas non-destructively – this means that only the canvas rotates.
This is the zoom tool, which is used to zoom in/out of your image. To zoom, simply click the image. Zoom in/out and be chosen at the top tool bar. This also gives the option to zoom to actual pixels, fit to screen, fill screen and print size.
This is used to choose colours. The top colour (black) is the foreground colour, and the bottom colour (white) is the background colour.
To chose a colour, click one of the coloured boxes.
The rounded arrow can be used to reverse these colours quickly.
_______________________________________________________
These icons are found at the bottom of the layers menu (usually situated down the right hand side of the screen)
- This is used to link layers. This can only be used when two or more layers are selected. Multiple layers can be selected by holding ctrl while clicking the layer names.
- This is used to add a layer style. A drop down menu appears with style options.
- This is used to add a layer mask.
- This is used to create a new filler adjustment layer.
- This is used to create a new group. Rather than merging layers, this is a good way to group layers. Select the layers you want to make into a group and drag onto this icon.
- When clicked, this creates a new layer. If you want to duplicate a layer, you can drag it onto this icon, and a duplicate will be made.
- This is used to delete a layer. You can either click this icon while the layer you want to delete is highlighted, or you can drag the layer/layers onto this icon.


